
The Stromberg Carburettor, widely fitted to British and European performance cars during the Fifties and Sixties, is defined by its constant-depression (constant-vacuum) design known to provide smooth fuel metering and good drivability.
 Commonly fitted on vehicles such as the Triumph TR4, Volvo Amazon and certain versions of the Jaguar E-Type, the Stromberg Carburettor was similar in principle to the SU carburettor, the Stromberg uses a diaphragm-controlled piston rather than a solid piston sliding directly in the dashpot.
Powered by air entering the carburettor passes through a venturi, the Stromberg Carburettor, as engine speed increases, causes a drop in pressure that lifts a piston attached to a tapered needle. This needle rises out of the main jet, allowing more fuel to mix with the incoming air.
Commonly fitted on vehicles such as the Triumph TR4, Volvo Amazon and certain versions of the Jaguar E-Type, the Stromberg Carburettor was similar in principle to the SU carburettor, the Stromberg uses a diaphragm-controlled piston rather than a solid piston sliding directly in the dashpot.
Powered by air entering the carburettor passes through a venturi, the Stromberg Carburettor, as engine speed increases, causes a drop in pressure that lifts a piston attached to a tapered needle. This needle rises out of the main jet, allowing more fuel to mix with the incoming air.
 The rubber diaphragm ensures controlled movement of the piston, maintaining consistent mixture strength across varying loads. A dashpot damper filled with light oil smooths piston movement, preventing flat spots during acceleration.
Before removal the Stromberg Carburettor, the vehicle battery should be disconnected for safety, and the air cleaner assembly removed to expose the carburettor. Fuel lines, vacuum hoses and throttle/choke linkages should also be disconnected, and it always a wise move to take photographs beforehand to ensure correct refitting.
Tools and materials required for the job are:
a cold degreaser,
flat-blade and crosshead screwdrivers,
flat-nose pliers,
open-ended spanner,
press nut,
engine oil
a carburettor screwdriver.
Using the appropriate spanner, the mounting nuts that secure the carburettor to the inlet manifold should be removed and the carburettor carefully withdrawn from its studs, taking care not to damage the mounting gasket.
The rubber diaphragm ensures controlled movement of the piston, maintaining consistent mixture strength across varying loads. A dashpot damper filled with light oil smooths piston movement, preventing flat spots during acceleration.
Before removal the Stromberg Carburettor, the vehicle battery should be disconnected for safety, and the air cleaner assembly removed to expose the carburettor. Fuel lines, vacuum hoses and throttle/choke linkages should also be disconnected, and it always a wise move to take photographs beforehand to ensure correct refitting.
Tools and materials required for the job are:
a cold degreaser,
flat-blade and crosshead screwdrivers,
flat-nose pliers,
open-ended spanner,
press nut,
engine oil
a carburettor screwdriver.
Using the appropriate spanner, the mounting nuts that secure the carburettor to the inlet manifold should be removed and the carburettor carefully withdrawn from its studs, taking care not to damage the mounting gasket.
 Before dismantling, the exterior of the unit should be cleaned thoroughly using a cold degreaser and a soft brush. Removing dirt at this stage prevents contamination from entering the internal passages during strip-down.
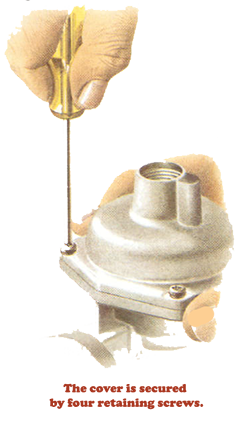
The next stage is to remove the dashpot damper from the top and drain the oil, taking care to mark the top cover so it can be refitted in the same orientation. The cover retaining screws should be released, and the cover lifted of carefully. Beneath it are the spring, diaphragm and piston assembly.
Before dismantling, the exterior of the unit should be cleaned thoroughly using a cold degreaser and a soft brush. Removing dirt at this stage prevents contamination from entering the internal passages during strip-down.
The next stage is to remove the dashpot damper from the top and drain the oil, taking care to mark the top cover so it can be refitted in the same orientation. The cover retaining screws should be released, and the cover lifted of carefully. Beneath it are the spring, diaphragm and piston assembly.
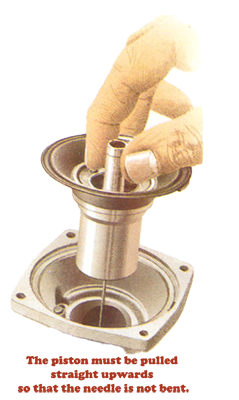
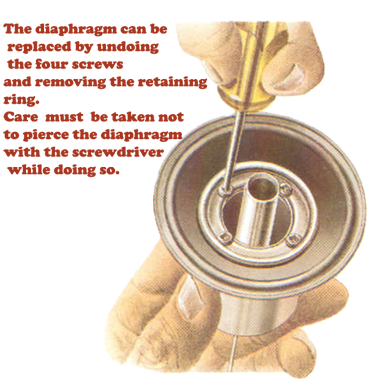 The piston and diaphragm should be removed together, at which point the. t the diaphragm inspected closely by holding it up to the light. If even the smallest crack is detected the diaphragm will require replacement.
It is also important to check that the needle is straight and secure. Worn needles or jets should always be replaced with the correct specification for the carburettor model.
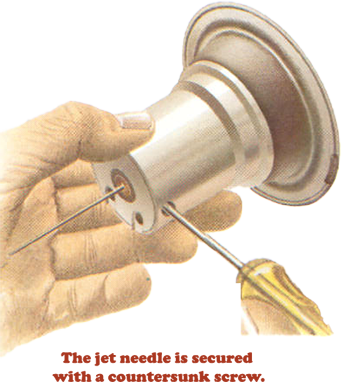
An original needle specified for the particular carburettor model should always be used, secured in place with countersunk screws.
The final stage in the disassembly prove is to remove the float chamber cover and inspect the float and needle valve, taking car to ensure the float is not fuel-soaked and that the valve moves freely.
The cleaning process should be carried out using carburettor cleaner aerosol to flush internal passages. Clean metal components only; avoid soaking rubber parts in harsh solvent.
The piston and diaphragm should be removed together, at which point the. t the diaphragm inspected closely by holding it up to the light. If even the smallest crack is detected the diaphragm will require replacement.
It is also important to check that the needle is straight and secure. Worn needles or jets should always be replaced with the correct specification for the carburettor model.
An original needle specified for the particular carburettor model should always be used, secured in place with countersunk screws.
The final stage in the disassembly prove is to remove the float chamber cover and inspect the float and needle valve, taking car to ensure the float is not fuel-soaked and that the valve moves freely.
The cleaning process should be carried out using carburettor cleaner aerosol to flush internal passages. Clean metal components only; avoid soaking rubber parts in harsh solvent.

 Reassembly should be carried out in reverse order, ensuring the diaphragm locating tab sits correctly in its groove. Refill the dashpot with SAE 20 oil or specialist carburettor damper oil. Fit a new mounting gasket before reinstalling the carburettor onto the manifold.
Once refitted, reconnect fuel lines and linkages, check for leaks, and adjust idle speed and mixture as specified. Properly maintained, a Stromberg carburettor provides reliable and smooth performance, perfectly suited to the character of a classic car engine.
Reassembly should be carried out in reverse order, ensuring the diaphragm locating tab sits correctly in its groove. Refill the dashpot with SAE 20 oil or specialist carburettor damper oil. Fit a new mounting gasket before reinstalling the carburettor onto the manifold.
Once refitted, reconnect fuel lines and linkages, check for leaks, and adjust idle speed and mixture as specified. Properly maintained, a Stromberg carburettor provides reliable and smooth performance, perfectly suited to the character of a classic car engine.
- Classic Car Engines
- Classic Car Gear Boxes
- Classic Car Clutches
- Classic Car Carburettors
- Classic Car Stromberg Carburettors
- Classic Car Cooling Systems
- Classic Car Cylinder Heads
- Classic Car Exhaust Systems
- Classic Car Filters
- Classic Car Hoses
- a Standard Clutch with a Slip Clutch
- a Classic Car Thermostat
- a Classic Car MEV Belt