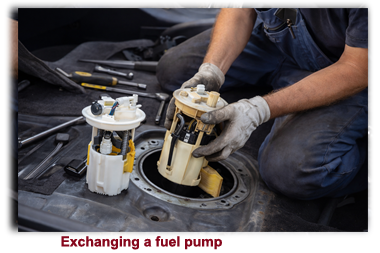
 Replacing a fuel pump and fuel gauge on a UK or European classic car from the Fifties or Sixties is regarded in the industry as a routine yet essential maintenance task.
 Most classic UK and European cars of this era use a mechanical fuel pump, typically mounted on the engine block and driven by the camshaft. Before beginning, ensure the vehicle is parked safely, the battery is disconnected, and the fuel system is depressurised.
Signs when it is time to consider replacing the fuel gauge and fuel tank
If the fuel gauge shows an empty tank even though it has just been filled, the fault is most likely due to a defective sender unit in the tank. Sometimes there may also be an interruption in the wiring between the sender and the gauge.
On the other hand, if the gauge remains on “Full” even after driving for some time, this may indicate a fault as well.
Checking the tank sender unit
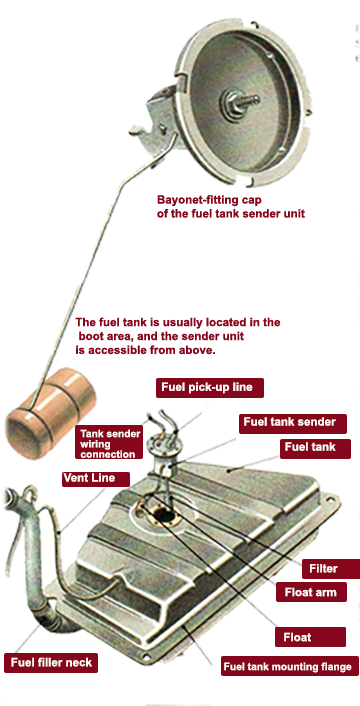
The sender unit is usually mounted on the top or side of the tank. If the fuel pick-up pipe is attached to the sender, you can simply follow the fuel line to locate it.
Most classic UK and European cars of this era use a mechanical fuel pump, typically mounted on the engine block and driven by the camshaft. Before beginning, ensure the vehicle is parked safely, the battery is disconnected, and the fuel system is depressurised.
Signs when it is time to consider replacing the fuel gauge and fuel tank
If the fuel gauge shows an empty tank even though it has just been filled, the fault is most likely due to a defective sender unit in the tank. Sometimes there may also be an interruption in the wiring between the sender and the gauge.
On the other hand, if the gauge remains on “Full” even after driving for some time, this may indicate a fault as well.
Checking the tank sender unit
The sender unit is usually mounted on the top or side of the tank. If the fuel pick-up pipe is attached to the sender, you can simply follow the fuel line to locate it.
 There are sometimes two electrical connections on the sender cover. One controls the gauge, while the second operates the low-fuel warning light. Check whether these connections are loose.
With a friend on hand to observe the gauge on the dashboard, switch on the ignition, disconnect the control wire from the sender, and hold it against the vehicle earth.
There are sometimes two electrical connections on the sender cover. One controls the gauge, while the second operates the low-fuel warning light. Check whether these connections are loose.
With a friend on hand to observe the gauge on the dashboard, switch on the ignition, disconnect the control wire from the sender, and hold it against the vehicle earth.
- If the needle moves towards “Full”, the wiring is sound; however, the sender unit with its float is likely defective.
- If the needle remains stationary when the wire is held against the tank, the tank is probably not properly earthed. In this case, loosen and retighten several of the tank’s mounting bolts to the body.
- If the needle does not move at all, the cable is usually broken.
If these checks produce no result, the next step is to remove and inspect the sender unit. The tank should be as empty as possible to prevent fuel spillage.
Loosen the retaining ring by turning it anticlockwise, tapping it gently with a hammer and drift if necessary.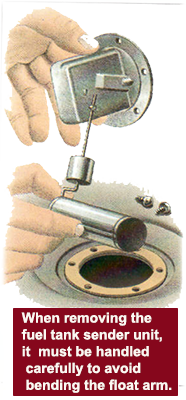 Carefully withdraw the sender unit. The long steel rod with the float beneath it must not be bent.
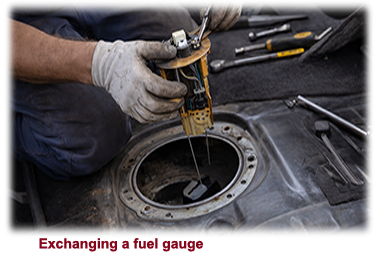
Remove the sealing gasket carefully to ensure no fragments fall into the tank.
Fit the new sender and gasket using sealing compound, then reconnect all electrical connections.
Checking the fuel tank
If you frequently notice a smell of fuel near the tank, first check the connecting pipework. If this is in good condition, fully expose the tank and inspect it for rust damage.
The upper side of the tank (inside the boot) is susceptible to corrosion from condensation, while the underside is exposed to stone chips and road debris. Some tanks also corrode from the inside out.
A rusted tank should not be soldered or welded—it should always be replaced with a new unit.
Replacing the fuel tank
Carefully withdraw the sender unit. The long steel rod with the float beneath it must not be bent.
Remove the sealing gasket carefully to ensure no fragments fall into the tank.
Fit the new sender and gasket using sealing compound, then reconnect all electrical connections.
Checking the fuel tank
If you frequently notice a smell of fuel near the tank, first check the connecting pipework. If this is in good condition, fully expose the tank and inspect it for rust damage.
The upper side of the tank (inside the boot) is susceptible to corrosion from condensation, while the underside is exposed to stone chips and road debris. Some tanks also corrode from the inside out.
A rusted tank should not be soldered or welded—it should always be replaced with a new unit.
Replacing the fuel tank
 When replacing the tank, you will need sealing materials as well as insulating strips for the metal retaining straps. These strips often trap moisture, which can lead to corrosion.
 It is advisable to replace the tank even if only small holes are present—not only because of constant fuel loss, but more importantly due to the risk of fire or explosion.
Removing and refitting the tank
The work is best carried out when the tank is nearly empty. Drain it completely via the drain plug, disconnect the fuel lines, and detach the flexible connection to the filler neck. Move the filler neck aside to remove the tank ventilation pipes. If the tank forms part of the boot floor, there will be several mounting bolts to remove. If it is located beneath the boot, it is often held in place by retaining straps. On some vehicles, the rear axle may need to be loosened. Install the new tank using fresh sealing compound and secure it in place. Renew the rubber pads on the retaining straps as well. Coat the underside of the tank with underbody protection.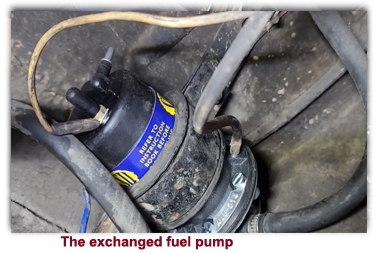 If the fuel gauge operates correctly with the new tank, the old sender unit may be reused. Fit it with a new gasket and sealing compound.
Before refitting the filler neck, check it for corrosion, as it often runs through a confined space behind the wing where dirt and salt water can accumulate.
There are often several vent pipes around the intake area, which must be routed carefully. It is advisable to blow them through with compressed air.
A blocked vent line has a similar effect to a clogged fuel filter. The engine will lack power, particularly at higher speeds, due to fuel starvation.
Without proper ventilation, a vacuum can form inside the tank, causing it to collapse and become damaged.
Finally, fill the tank with fuel and check all hoses for leaks.
If the fuel gauge operates correctly with the new tank, the old sender unit may be reused. Fit it with a new gasket and sealing compound.
Before refitting the filler neck, check it for corrosion, as it often runs through a confined space behind the wing where dirt and salt water can accumulate.
There are often several vent pipes around the intake area, which must be routed carefully. It is advisable to blow them through with compressed air.
A blocked vent line has a similar effect to a clogged fuel filter. The engine will lack power, particularly at higher speeds, due to fuel starvation.
Without proper ventilation, a vacuum can form inside the tank, causing it to collapse and become damaged.
Finally, fill the tank with fuel and check all hoses for leaks.
![]()
- Classic Car Engines
- Classic Car Gear Boxes
- Classic Car Clutches
- Classic Car Carburettors
- Classic Car Stromberg Carburettors
- Classic Car Cooling Systems
- Classic Car Cylinder Heads
- Classic Car Exhaust Systems
- Classic Car Filters
- Classic Car Hoses
- a Standard Clutch with a Slip Clutch
- a Classic Car Thermostat
- a Classic Car MEV Belt


Take me back to the home page.
me3