A sure sign that all is not well with a classic car’s front brake calipers, is when the vehicle begins to pull to one side, either right of left.
Brake callipers are the large hydraulic clamp that presses the brake shoes against the disc-brake rotor.
Many cars are equipped with sliding callipers that utilise a single hydraulic piston.
 Also known as floating callipers. slide callipers began to be fitted on UK cars from the early Sixties as part of the wider adoption of disc brakes. To cut cost and weight, manufacturers particularly Girling, were pioneers in the development of the sliding single-piston calliper, which pushed the inboard pad directly while allowing the body to slide, pulling the outer pad into contact.
Faulty brake calipers are a phenomenon that is not only distracting but can be dangerous. If the vehicle is pulling to the left, but it's more probable that the issue originates from the right front wheel and if pulling to the right, the left wheel calipers must be closely inspected and will probably need replacing.
Certain UK car models began to feature fixed callipers that included one or two pistons on either side, resulting in a total of two or four pistons.
In order to receive a clear picture as what should be done to get the vehicle’s steering back on track, the first step is to remove the wheel in question and examine it closely.
It is not uncommon to discover that the vehicle’s brake shoes still have a good amount of brake lining remaining as they have little effect on the calliper problem.
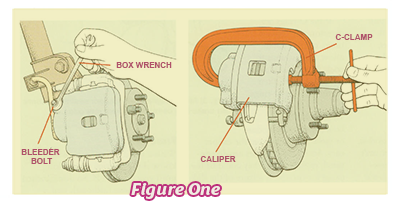
The next stage is to inspect the brake fluids level in the reservoir. If it is filled to the maximum, it might be worthwhile considering syphoning out a small amount to prevent overflow during the test. Position the clamp so that the top edge of the C aligns with the midpoint of the inboard side of the calliper, which is located behind the piston, ensuring that the tip of the forcing screw is directly opposite.
 The shape of the calliper can influence how the forcing screw interacts, as it may press against the back side of the outboard brake shoe or potentially make contact with the rotor surface.
If the calliper successfully completes this test, it is important to conduct a further one. That is to ensure that the bleeder valve is loosening properly ( See Figure One). If that procedure is not successful, it is very possible that the valve will need to be replaced. supports the calliper. To get a clear view, you'll need to remove the calliper.
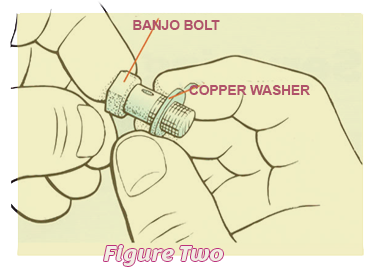
 Removing a sliding calliper is a simple process ( See Figure Two). Typically, there are two bolts securing it to its anchor frame. Alternatively, there is a single bolt at the bottom along with a locating stud at the top, a design usually referred to as a flip-up design.
To minimise brake fluid loss and reduce the need for bleeding after the job, it is recommended to use a g-clamp or padded locking pliers to clamp off the brake hose near the calliper. The next stage is to loosen carefully the bolt ( or bolts ) securing the hose to the calliper. Take out the bolt or bolts that secure the calliper.
Once the calliper is removed from the bracket, carefully unthread the brake-hose banjo bolt and use a rag to catch any fluid that may drip out. Replace the calliper by installing a new one, ensuring to use new sealing washers for the brake hose.
It's important to note that many calliper bolts are not intended for reuse. Therefore, if the vehicle manufacturer advises against reusing them, it's best to obtain new ones.
 If the calliper piston fails to return smoothly, it’s likely that the calliper isn’t sliding properly due to corrosion or sticking affecting the movement of the calliper bolts in the calliper ear bushings, meaning that the machined guides may be rusted. In that case a wire brush is effective for removing rust from the guides and calliper edges. After cleaning, it's important to lubricate both with an appropriate water-repellent grease.
If the rust is more significant the calliper might need a gentle refinement using a file. If the bolts are sticking in the bushings, it's advisable to replace them and apply the same type of grease for lubrication.
If the O-rings begin to show signs of wearing out it would be advisable to change them as soon as possible.
If the O-rings begin to show signs of wearing out it would be advisable to change them as soon as possible.
When using a fixed calliper, it's important to remove it to determine if the pistons are sticking. It's important not to loosen the brake hose, but you should check if the bleeder valve is stuck. Take out the mounting bolts—typically there are two, but there may be four in some cases. Use wire to hang the calliper, which will help relieve any tension on it.
Back to the homepage- and don't spare the horsepower.
UB4


