 The distributor in a classic car ignition system plays a central role in controlling when and where the spark occurs to ignite the air-fuel mixture in each cylinder.
Key Components in an Ignition System:
- Ignition Coil: Generates the high voltage.
- Rotor Arm: Directs spark from coil to each plug lead.
- Cap: Connects each plug wire to rotor path.
- Spark Plug Wires: Carry spark from cap to spark plugs.
- Spark Plugs: Ignite the air/fuel mixture.
Removing and reinstalling a distributor on a classic car requires precision to maintain correct ignition timing.
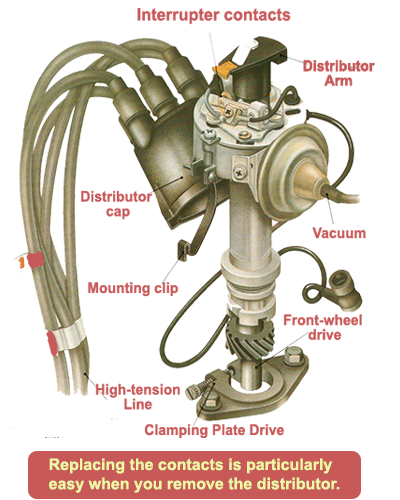 With some vehicles, access to the distributor is difficult, so it is better to remove it for changing the contacts. You place a wrench on the nut of the crankshaft pulley and turn it until the first cylinder reaches its top dead centre and mark the position of the distributor rotor relative to the distributor housing. The distributor shaft is also marked on the engine housing. If the engine does not rotate with the distributor removed, reinstallation is very simple. For safety reasons, one should never skip disconnecting the battery.
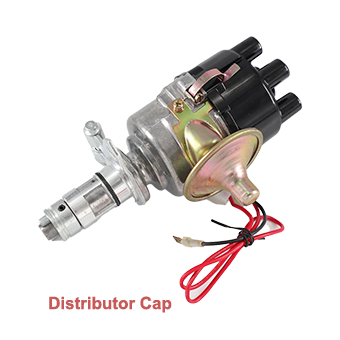
Remove the distributor cap.
The two clips of the distributor are pressed off with a screwdriver. Sometimes the distributor cap is also secured with two screws. The distributor rotor under the cap and the dust cover are removed. You now look for the marking of the first cylinder.
Prepare for removal. Using a wrench placed on the screw of the crankshaft pulley, turn the engine until the distributor finger points to the marking of the first cylinder.
Before removing the distributor cap, mark the position of the first cylinder with a pencil line on the housing, if no marking has already been made at the factory.
Temporarily place the distributor cap and mark the first cylinder with a pencil line on the housing. You disconnect the vacuum lines for the distributor control and the low-voltage cable from the ignition coil.
 Removing the distributor using a clamp attachment Often, the distributor is attached with a screw on the left side of the base plate and clamp, and it is pried out. slot attached. If the distributor is fitted with a slotted tooth, all that is required to slightly turn the clamping screw till it is free, then gently pull the distributor out of its guide. at the housing, as it is important for reinstallation, the distributor housing is clamped, and it is placed on the right.
Very often, the distributor is mounted on a base plate with a clamping slot.
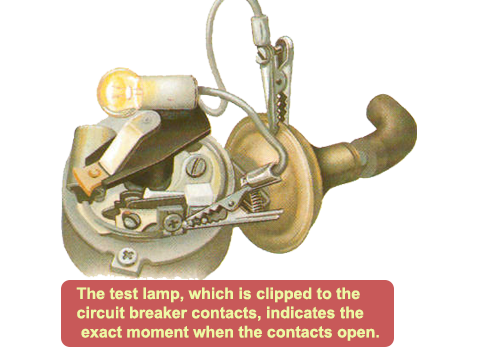
In this position, the first cylinder is engaged, the contacts are open.
Distributor attachment with dowel pins
 In some vehicles fitted with an overhead camshaft, the distributor is located in the extension of the camshaft and is held by studs. To remove it, you turn the nuts and washers down.
Beforehand, it is important to precisely mark the distributor's setting relative to the cylinder head. If the housing does not come off, carefully use a screwdriver between the distributor housing and the clamping flange to help.
If the distributor housing is stuck, a little gentle persuasion with a screwdriver may be required.
Insert the distributor: The distributor shaft is aligned so that the distributor finger points to the marking of the first cylinder.
For distributors with a groove connection, a slot must be aligned. When driving with a helical gear, the distributor shaft should be turned so that it points almost to the second marking and not to the TDC marking of the first cylinder.
When inserting the distributor housing, it is necessary to move the distributor shaft back and forth by a few degrees so that the shaft can align itself.
If the markings of the distributor match each other, secure the screw connection and connect the lines. The distributor setting is checked with the stroboscope.
Distributor with claw connection.
Installation of the distributor, in case the engine has been turned
So that the ignition sequence specified by the designer is correct when the distributor is installed, the camshaft and crankshaft must be precisely aligned. The ignition spark of each cylinder is triggered just before the end of the compression stroke at the top dead center (TDC).
You can easily feel the top dead center (TDC) of a cylinder by placing your thumb over the spark plug hole and turning the engine. At the end of the compression stroke, you notice that the pressure no longer increases. You can also remove the valve cover and observe the valve drive.
If both valves of the first cylinder are still while the valves of the fourth cylinder are moving, you have reached the TDC for the first cylinder. Additionally, TDC markings can be placed at the following locations: on the
Installing the distributor cap:
Before placing the distributor cap, clean it inside and out and check the segments of each cylinder for signs of erosion and leakage currents, which appear as black streaks.
Distributor with helical gear
Flywheel and on the clutch housing or on the front pulley or also on the camshaft gear,
Before putting on the distributor cap, inspect it for hairline cracks.
where the marking must align with an edge. Only when all adjustment marks are aligned, can the fine adjustment of the distributor be made.
 The fine adjustment is turned from stop to stop. In doing so, you count the revolutions. This number is divided by two, and the adjusting nut is turned back accordingly.
Insert the distributor so that the finger aligns with the marking of the first cylinder on the distributor housing.
If the valves of a cylinder remain still, even when the crankshaft is turned slightly forward and backward, you have found the top dead center (TDC) of that cylinder.
Adjustment options: On some distributors, you will find a fine adjustment on the housing using a knurled nut. It is important to find a middle setting. You therefore manually turn the adjustment nut once from end stop to end stop and count the revolutions. Subsequently, you turn the adjustment by half the number of turns and thus find the middle adjustment.To check the ignition timing, the optical technique is used. With electronic ignition, the adjustment is only possible with the stroboscope.
Distributor Variants: With some types of distributors, the drive gear remains in the engine because it is not particularly secured. For reinstallation, it is removed with a wire, cleaned, and reinserted before mounting the distributor. Occasionally, there are also gaskets on the distributor flange that should always be replaced. Sometimes, distributors have TDC sensors near the clutch housing, making it impossible to see the TDC mark. These sensors can be removed.
Once all of these procedures have been successfully carried all that remains is to make final adjustments to the static timing. This is done by turning on the ignition, slowly rotating the distributor until you hear the spark at plug #1 (or see a test light blink if connected across the points). At this point the distributor lightly should be locked, the engine should start and run reasonably well if set correctly.
If further fine tuning is required, then the use of a timing light may be necessary
To allow final checks the vehicle should be taken for a short test drive to ensure smooth acceleration and idle. The tester should listen for any pinging under load. If heard, the timing will need to reset slightly.